Translate

Sunday, March 15, 2015

Lickety-Split Tuna Casserole


As a child growing up, certain dishes sounded repulsive to my undeveloped ears.  The word "cheesecake" would evoke images of melted cheddar cheese oozing over the side of a pie crust.  Not nice!  It took me until I was married to be courageous enough to try it, and I immediately felt like I had been missing out my whole life.  Another dish, "tuna casserole" sounded repugnant until I tried it.  That perception couldn't be farther from the truth; this casserole is creamy, hearty, and really delicious.  Thank goodness the palate develops with maturity!  This recipe is super quick and easy; perfect if you are observing lent, and this dish is stick-to-your-ribs fare that will have your family begging for more.

Ingredient List:

Two boxes of instant parmesan noodles
One twelve ounce can of all-white albacore tuna (in water, NEVER oil)
Approximately two cups frozen sweet or snow peas
3/4 cup milk, divided
1/2 teaspoon salt
Two tablespoons butter
One cup crushed saltine crackers or croutons
1 cup grated Parmesan, divided
Fresh cracked black pepper


Open tuna, drain.  Set aside.  Cook noodles according to package directions.  Add frozen peas, tuna, and 1/4 cup of milk to pan and cook until peas are heated.  In a large casserole, combine 1/2 cup Parmesan, butter, salt, remaining milk, and noodle mixture.  Mix altogether.  

When I cook, I like things fast and uncomplicated...likely due to the fact that I am feeding seven!  To top this casserole, panko is a lovely idea.  However, if you don't have it on-hand, saltines or crushed croutons work amazingly well.


Sprinkle your crushed crackers over the casserole along with the remaining grated Parmesan.  Bake at 350 degrees for approximately 10-20 mins or until crust is golden brown and casserole underneath is bubbly.  

Serve with freshly cracked pepper!  Enjoy!


If you enjoy this post, please visit the archives!  You may also visit my full profile to view my other blogs. Connect with me on my Facebook Page, Parsimonious Décor Darling.   You might like to visit my other blog hubs,

The Marvelous Maison, a lifestyle blog hub and 
Frugal Fab Fashionista, my fashion blog hub. 

Follow me on Pinterest!!  Please be sure to kindly follow the board guidelines, as it takes time and effort to find fabulous pins across the Internet and Pinterest!  Thank you!  

Thank you for stopping by! ❤


Wednesday, February 25, 2015

Easy Asian Chicken Salad

As winter begins to finally fade away, my palate almost always begins to crave a lighter menu.  It may have to do with some sort of evolution:  when it is cold, we like heavier foods, packing on the pounds (oh, dear), to ensure our warmth.

Now that it at last beginning to look like Spring may arrive, it's the perfect time for fresh salads.  This recipe is simple, easy, and infused with wonderfully sweet and exotic flavors.

You will need:

Skinless, boneless chicken breasts
Orange juice
Unsalted roasted slivered almonds
Crispy dried wonton or chow mein noodles
Spring greens
Water chestnuts
Canned mandarin oranges
3-5 tablespoons peanut or vegetable oil

I begin by butterflying my breasts.  Butterflying is usually preformed prior to grilling meat, but I also do it here to ensure the meat is flavorful throughout.


Place the breast meat into a bowl and pour enough orange juice into the bowl so that it nearly covers or just covers the breast.  Place in refrigerator and allow to marinate for 30-45 minutes.

Heat your oil on medium to high heat.  Season your chicken, and reserve the marinade. For this recipe, I didn't want strong or conflicting flavors to compromise the sweetness of the meat, so I used a lighter hand than I typically do.  I seasoned the meat with onion powder, garlic powder, and a bit of regular table salt.  You may also opt to use Kosher salt.

When the oil is hot, place breasts into the pan, and sear on both sides. 

When the meat is seared, but not cooked through, add approximately 1/4 cup of the orange juice you used to marinade the meat.  Reduce heat to medium and continue to heat until all liquid is reduced, and meat is cooked through.  As your meat is cooking, use this time to open your canned mandarins and canned water chestnuts.  Drain both and place into a container in the refrigerator.  Remove meat from heat and place into a clean dish and put the dish into the refrigerator until the meat is cold.

When all of the elements you placed into the refrigerator are completely cold, it's time to construct your salad.  Cut your chicken into bite-sized pieces. Set aside.

For this salad, I love a spring green mix, which includes earthy and tart, semi-bitter leaves such as baby spinach and arugula. 

Toss your greens with:
your chicken, slivered almonds, wonton or noodles, mandarins, and water chestnuts.


Enjoy!  This salad is best with an Asian Sesame dressing, or a light and fruity vinaigrette such as raspberry walnut or sweet balsamic.


Variation:  If you would like to add another dimension, you can consider adding steamed, cooked edamame.  Just be sure you also cool the edamame after cooking and prior to adding.


If you enjoy this post, please visit the archives!  You may also visit my full profile to view my other blogs. Connect with me on my Facebook Page, Parsimonious Décor Darling.   You might like to visit my other blog hubs,

The Marvelous Maison, a lifestyle blog hub and 
Frugal Fab Fashionista, my fashion blog hub. 

Follow me on Pinterest!!  Please be sure to kindly follow the board guidelines, as it takes time and effort to find fabulous pins across the Internet and Pinterest!  Thank you!  

Thank you for stopping by! ❤


Saturday, February 14, 2015

Easy Valentine's Day Cakes


If you are in a pinch for tonight's festivities, here is a quick and easy idea!  As usual, I will fall back on my favorite go-to cake recipe, but if you want to save even more time, a boxed cake works just as well.  To make these cakes, I used molds found at The 99¢ Store.  

Each mold includes hearts and roses.  I decided to make hearts, perfect for tea after dinner!


Begin by greasing your pans generously with shortening, and set aside.

Hershey's Chocolatetown Special Cake

You will need:

1/2 cup Hershey's Cocoa
1/2 cup boiling water
2/3 cup shortening
1 3/4 cups sugar
1 teaspoon vanilla
2 eggs
2 1/4 cups unsifted all-purpose flour
1 1/2 teaspoons baking soda
1/2 teaspoon salt
1 1/3 cups buttermilk or sour milk*
Paper baking cups

*To make sour milk:  mix 4 teaspoons vinegar plus milk to equal 1 1/3 cups.

Preheat oven to 350 degrees.  Stir together cocoa and boiling water in a small bowl until smooth.  Set aside. Cream shortening, sugar, and vanilla together in a large bowl until light and fluffy. Add eggs; beat well. Combine flour, baking soda and salt in a separate smaller bowl. Add alternatively with buttermilk to creamed mixture.  Blend in cocoa mixture.   Pour batter into your mini bundt pan leaving a 1/4 inch space for rising.  Pour the remaining batter into the springform pan.  It should be approximately one-inch thick if you use a small to medium pan.  Place mini bundt pan on a cookie sheet.  Bake bundt cakes at 350 degrees approximately 15-25 minutes or until an inserted cake tester or toothpick comes out clean. Cool ten minutes.  Remove from pan. Cool completely on a cookie cooling rack with a piece of wax paper beneath.  Set aside.

To frost these delightful little cakes, I used candy melts.  Melt the candy in a double boiler or on very low heat in a non-stick pan.


Continue to heat, stirring constantly until the candy is completely melted and smooth.

When the candy is completely melted, drizzle directly onto your cakes on the cookie rack.  Place in refrigerator until ready to serve, or until the candy congeals and hardens.  If you'd like the details on my china, you can visit the post on my blog Parsimonious Décor Darling here


If you enjoy this post, please visit the archives!  You may also visit my full profile to view my other blogs. Connect with me on my Facebook Page, Parsimonious Décor Darling.   You might like to visit my other blog hubs,

The Marvelous Maison, a lifestyle blog hub and 
Frugal Fab Fashionista, my fashion blog hub. 

Follow me on Pinterest!!  Please be sure to kindly follow the board guidelines, as it takes time and effort to find fabulous pins across the Internet and Pinterest!  Thank you!  

Thank you for stopping by! ❤
  

Wednesday, December 17, 2014

Seven Way Spritz


Christmas is almost here!  Such a wonderful time of year!  It's good to remember why we celebrate this special day which commemorates the birth our our Savior, but it's also great to participate in the fun and whimsical aspect of the season as well.  Part of celebrating whimsy is playing along with the tradition of Santa Claus.  

Every year on Christmas Eve, my children and I place the traditional plate of cookies and milk for Santa.  My favorite to bake each year is Spritz.

Spritz are wonderful, light butter cookies that you make by using a cookie press.  The word Spritz is actually derived from the German word spritzen, meaning to squirt or spray.  This recipe from the Pillsbury Company is the one I have used for years and years, and it is so easy, it's almost fail-proof.  :0)

Ingredient List:

1 cup powdered sugar
1 cup real butter, softened
1/2 teaspoon pure vanilla extract
1 egg
2 1/3 cups all purpose flour
1/4 teaspoon salt

In addition to the ingredients, to make these yummy cookies, you will need:
A cookie press
An ungreased cookie sheet
Cake or Cookie decorating bag and accoutrement
Assorted sprinkles
Frosting
Sugar wash


Preheat oven to 400.  In a large bowl, beat powdered sugar, butter, vanilla, and egg until light and fluffy.  Stir in flour and salt; blend well.  I must say that when my hubby surprised me with my Kitchen Aid mixer, it took some getting used to.  I even still prefer sometimes to use an old-fashioned bowl and hand mixer.  However, with cookies, this mixer SHINES!  I love using the mixer to make cookies, there is such an ease of removal of the dough, it rarely sticks to either the beater or bowl, and works wonderfully.


Fill your cookie press with dough and fit with your desired cookie plate.  Press the dough onto the ungreased cookie sheet.


Bake at 400 for 5 to 7 minutes or until lightly browned on the edges.  Immediately remove from cookie sheets, and cool completely on a cookie cooling rack.

You may serve these cookies plain, and they are lovely.  For my Spritz this year, I thought dressing them up would be fun.  Here are seven different ways (other than plain) to dress up your Spritz.
 

You could spray the cookies with food color spray,


shown here.


Sprinkle the cookies with traditional sugar sprinkles,


Or, make a quick frosting, and use a cake or cookie decorating kit to bead frosting onto the cookies.
My frosting recipe is really simple.  To make bright white frosting, combine approximately 1/4 cup of powdered sugar with 2 tablespoons shortening, and mix well until it is the desired consistency.  Think Oreo cookie cream consistency.


Spoon the frosting into the decorating bag,


and carefully bead onto the cookies.


You can even add fun Sprinkles after you've beaded the frosting, such as these cute red and green mini Christmas trees,


or these pretty blue sprinkles with tiny snowflakes.


Or spray with color, then frost.


Here, I sprayed with color, frosted, then also added mini candy canes to each cookie.


Lastly, you can brush the cookies with a sugar wash (powdered sugar and water), then sprinkle.


  This also keeps the sprinkles in place.


The sprinkles I used came in a multipack of six.  Supercute!!  Gotta love HomeGoods!


To see these cookies featured in my setting for Spritz With Saint Nick, you may visit the post on my blog Parsimonious Décor Darling by clicking here


If you enjoy this post, please visit the archives!  You may also visit my full profile to view my other blogs. Connect with me on my Facebook Page, Parsimonious Décor Darling.   You might like to visit my other blog hubs,

The Marvelous Maison, a lifestyle blog hub and 
Frugal Fab Fashionista, my fashion blog hub. 

Follow me on Pinterest!!  Please be sure to kindly follow the board guidelines, as it takes time and effort to find fabulous pins across the Internet and Pinterest!  Thank you!  

Thank you for stopping by! ❤

Sunday, November 30, 2014

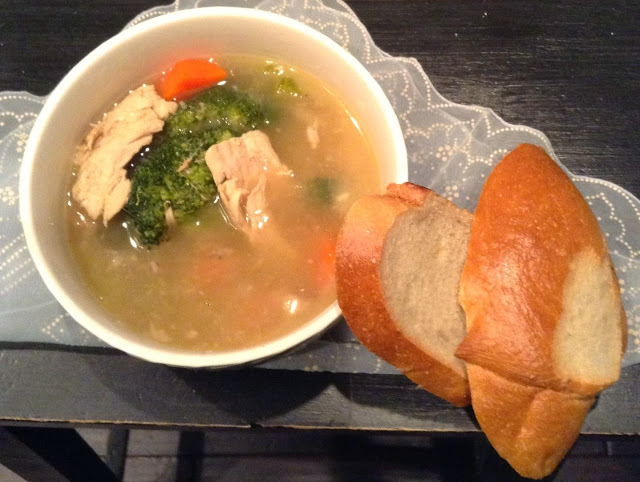
Best-Ever Turkey Soup

If you've read my blog before, you know that one of my favorite cold-weather foods is soup.  So warming for the body and soul!  Today, I am sharing a tradition that I started with my family several years ago.  Every Thanksgiving, I roast a turkey.  Come Sunday, I traditionally use all the remaining meat in a soup.  This soup is very flavorful and a favorite for us! 


For this soup, you will need:

Leftover turkey
One small onion or half a large onion
Garlic cloves, approximately 5-6
Carrots
Broccoli
Celery stalks, approximately three large
A large stockpot
Chicken bouillon
Celery salt
Garlic powder
Onion powder
Small amount of black pepper

Begin by deboning your fowl.  Cube all meat; reserve a bit of fat and broth leftover from roasting as well.  Set aside. 

Fill your stockpot with water.  Put on to boil.  Rinse all vegetables; peel carrots and rinse, set aside.


Chop onion into hearty pieces.  Add to pot.


Add sliced garlic.


Chop celery into pieces, including leaves, and add to pot.  Bring to a boil.


Add cubed turkey, roasting broth, fat, and also add chicken bouillon, approximately two tablespoons.  I personally prefer Caldo Pollo.


Add garlic powder, onion powder, approximately one to two teaspoons each.  Also add celery salt and a small amount of pepper.  Important:  do not omit the celery salt.  It gives the soup the perfect flavor.  I am very heavy-handed with it, but you may use your own discretion.  It smells wonderful in the kitchen!


For this soup, I love hearty pieces of broccoli.  Not only do I include the tops, but I also peel


and chop the stalks into hearty pieces.  


When the onion is transparent, and the celery is almost cooked through,  
add the broccoli.
 

Slice carrots.  When the broccoli is halfway done, add the carrots.  Carrots cook just a bit faster than the broccoli, so I always add them secondary.
 

As the soup boils, the fat will rise.  Remove it with a ladle.
 

All set!  This lovely and tasty soup is best paired with a crusty sourdough.  So good!  Freeze leftovers immediately, or use within 2-3 days.


If you enjoy this post, please visit the archives!  You may also visit my full profile to view my other blogs. Connect with me on my Facebook Page, Parsimonious Décor Darling.   You might like to visit my other blog hubs,

The Marvelous Maison, a lifestyle blog hub and 
Frugal Fab Fashionista, my fashion blog hub. 

Follow me on Pinterest!!  Please be sure to kindly follow the board guidelines, as it takes time and effort to find fabulous pins across the Internet and Pinterest!  Thank you!  

Thank you for stopping by! ❤


Thursday, November 27, 2014

Superrific Pumpkin Bread Mini Loaves


Do you have any traditions on Thanksgiving?  We certainly do in our house!  No Thanksgiving would be complete without traditional banana bread for breakfast (recipe in the archives).  This year however, I decided I would do something a little different and make pumpkin in addition to my typical banana.  This easy and quick bread is light, spicy, and sweet; just perfect for tea, hot coffee, or hot chocolate. 


Preheat Oven to 350 degrees.  Spray mini muffin tins with butter-flavored cooking spray.

Sift together:
1 3/4 cups sifted all-purpose flour
1/4 teaspoon baking powder
1 teaspoon baking soda
1 teaspoon salt
1/2 teaspoon cinnamon
1/4 teaspoon ground cloves

In a large bowl, beat until light and fluffy:
1 1/3 cups sugar
1/3 cup soft shortening
2 eggs

Add and beat in:
1 cup cooked or canned pumpkin

Now add the sifted dry ingredients in 3 additions alternately with:
1/3 cup milk
1/2 teaspoon vanilla

Fold in:
1/2 cup chopped nuts

mix altogether and pour into mini muffin pans.  Place mini pans onto a cookie sheet and bake approximately 25-40 minutes or until toothpick comes out clean.  There's nothing like a crisp winter morning with the scent of fresh bread baking in the oven!

Closer look as they were just beginning to rise.  Mmmmm! 


Enjoy!!  They can be enjoyed by themselves 


or with coffee or tea along with a slice of banana bread to compliment.  ;)


If you enjoy this post, please visit the archives!  You may also visit my full profile to view my other blogs. Connect with me on my Facebook Page, Parsimonious Perfection.   You might like to visit my other blog hubs,

The Marvelous Maison, a lifestyle blog hub and 
Frugal Fab Fashionista, my fashion blog hub. 
 
Follow me on Pinterest!!  Please be sure to kindly follow the board guidelines. Thank you!  
 
Thank you for stopping by! ❤