Translate

Sunday, December 8, 2013

Tex-Mex Style Chicken Soup

At the first iota of an inkling of colder weather, my kiddos (and admittedly the hubs and I) get our palates ready for one of our favorite cold-weather foods. We love soup!  Nothing warms the body nor the soul like a great bowl of hot soup.  Chicken soup, in particular, is one of my favorite things to cook for our family.  My recipe for this post, which incorporates the use of Hispanic seasonings, gives this chicken soup a decidedly Tex-Mex flavor.   

You will need: 

Chicken drumsticks, frozen or thawed
Cilantro (about 1/2 of a bunch)
One 8 ounce can of Rotelle tomatoes (I like lime cilantro or green chili flavor)
One whole garlic 
One small onion or half a large onion
Three large ears of corn
Two lemons
Four bell peppers of your choice. 
Approximately five medium-sized carrots 
Two stalks of celery
Caldo Pollo bullion
Celery Salt 
Begin by rinsing all of your vegetables.  Shuck corn, rinse.  Zest the lemons and discard skin (meaning peel, but minimally and not down to the flesh) .  IMPORTANT.  You must taste a small bit of lemon to ensure they are sour, and NOT bitter.  Bitter lemon can wreak havoc and ruin your whole dish.  Slice onion and peppers into large pieces or slivers.  Think fajita sized.  You may opt to hull your peppers and discard the inner flesh and seeds; if you prefer a spicer version, leave as is.  Slice garlic into thin slivers.  Divide lemons into quarters or six pieces each.  Remove as much seeds as possible.  Set lemon aside. Chop celery and remove any leaves. Discard the leaves.  Cut corn into pieces approximately two inches wide.  Set aside with other vegetables. Peel carrots, and slice into 1 inch sized peices. Reserve carrots. 

Years ago, a friend of ours Eric made a soup using whole drumsticks.  I had never seen it done before, but the soup was terrific. Every time I make this particular soup, I utilize that technique.  Fill a large stock pot with water.  Place all of the prepared vegetables (except carrots) and lemon pieces into the pot along with the drumsticks.  Using kitchen scissors, chop cilantro and add to the pot.  Add the canned tomatoes. Cook on medium to high heat.  Once you put your soup on, peel and chop your carrots.   As your soup cooks, add the Caldo bullion to your liking.  Add approximately one to two tablespoons of celery salt.   

Starting to become lovely, no?  I love the aroma of these flavors as they meld!

Continue cooking until the vegetables are cooked through.  You can gauge that by looking to see if the onion is transparent.  I am not a fan of raw celery, so I tend to use the celery as a gauge.  If the celery is cooked through, the other vegetables will certainly be.   Finally, add the chopped carrots. Carrots cook fairly quickly, so always add them last or they will be overcooked.  When the carrots are firm but you are able to pierce them with a fork or knife easily, your soup is ready to enjoy!

I prefer to serve this wonderful soup with a nice dollop of white or Spanish rice along with warm tortillas, tortilla chips, or both.

If you enjoy this post, please visit the archives!  You may also visit my full profile to view my other blogs. Connect with me on my Facebook Page, Parsimonious Perfection.   You might like to visit my other blog hubs,

The Marvelous Maison, a lifestyle blog hub and 
Frugal Fab Fashionista, my fashion blog hub. 

Follow me on Pinterest!!

Thank you for stopping by! ❤


Monday, November 18, 2013

Thanksgiving or Christmas Stuffing Makeover

I have such fond memories of my grandmother at Thanksgiving making her traditional from-scratch cornbread stuffing. I so miss that wonderful flavor.  Times definitely have changed...people tend to be busier and want things faster.  If you find yourself in a time-crunch this holiday season, this recipe is an easy way to make a delicious stuffing, lickety-split. 

You will need:  

Two boxes of instant stuffing (stovetop is my favorite)
1/2 cup walnuts or filberts
1/2 cup of dried cranberries
1/4 teaspoon thyme
2-3 tablespoons water

Begin by preparing stuffing according to package directions, set aside. 

Finely chop walnuts and cranberries.  Add to stuffing with 1 tablespoon of water. 
Across your stuffing, sprinkle the 1/4 teaspoon of thyme.  Add 1 tablespoon water. Mix altogether. This stuffing is best when used inside your fowl.  If comes out so wonderfully. 


If you enjoy this post, please visit the archives!  You may also visit my full profile to view my other blogs. Connect with me on my Facebook Page, Parsimonious Perfection.   You might like to visit my other blog hubs,

The Marvelous Maison, a lifestyle blog hub and 
Frugal Fab Fashionista, my fashion blog hub. 
 
Follow me on Pinterest!!
 
Thank you for stopping by! ❤


Mini Banana-Nut Loaves

Hello, friends!  Thank you for visiting my blog.

In our home, we really adore banana bread.  We love it as a snack, dessert, or as a traditional breakfast on Thanksgiving morning.  The following recipe is one I've used for several years and I absolutely love it.  You may use this recipe to make a traditional 9X5 loaf, or several mini loaves such as I've done here.

Ingredient List:
3/4 cup sugar
1/2 cup real butter, softened (do not substitute)
2 eggs
1 1/4 cup (approximately 2 1/2 medium to large) very ripe bananas, mashed
1/3 cup milk
1 teaspoon vanilla
2 cups all purpose flour
1/2 cup chopped walnuts
1 teaspoon baking soda
1/2 teaspoon salt
1-2 tablespoons melted butter
1-2 tablespoons sugar for dusting

Preheat your oven to 350 degrees.  Grease bottoms of your mini loaf pans.  I personally prefer to use butter-flavored Crisco. 

In a large bowl, beat sugar and butter together until it has a light and fluffy consistency.  Beat in eggs.  Add mashed bananas, milk, and vanilla; blend well.  In a separate medium-sized bowl, combine flour, nuts, baking soda, and salt...mix thoroughly.  Add banana mixture to dry, stir until dry ingredients are moistened.  

Pour mixture into your pan(s).


Bake at 350 for approximately 50 minutes for one loaf, 40-45 for mini loaves.  I like a dense loaf, so do not overcook or the bread will turn out dry.  You can gauge this by inserting a toothpick into the bread.  The toothpick should come out almost completely clean.  


Remove your loaves from the oven. While still warm, brush with melted butter. 


Dust with sugar.


Cool approximately 3 minutes before removing from your pan.  Enjoy!

If you enjoy this post, please visit the archives!  You may also visit my full profile to view my other blogs. Connect with me on my Facebook Page, Parsimonious Perfection.   You might like to visit my other blog hubs,

The Marvelous Maison, a lifestyle blog hub and 
Frugal Fab Fashionista, my fashion blog hub. 
 
Follow me on Pinterest!!
 
Thank you for stopping by! ❤


Saturday, October 26, 2013

Quick and Easy Chow Mein

Some of my favorite types of food in the whole world are dishes that come from the Orient.  From delectable Sushi in Japan, Pad Thai in Thailand, and the stir-frys of China, I adore them all!  One of my favorite Chinese dishes is Chow Mein.  This recipe for Chow Mein is super quick and easy. 
 
You will need:
 
1 small Onion
Garlic, approximately 2-3 cloves
Beef or Pork, approximately 1.5 lbs (I used a package of beef stew meat for this recipe)
Carrots, 3-4 medium
Cabbage (approximately 1/2 cup)
Six packages of instant Ramen noodles
Green onion as garnish
1-3 Tablespoons of Vegetable or Peanut oil
Dash Soy Sauce
1/4 Teaspoon Garlic Salt
 
First, put on a pot to boil.  Cook your Ramen noodles according to the package directions and set aside.  For this recipe, I used two Oriental Flavor, Two Beef Flavor, and Two Spicy Chile Shrimp.  Be sure to omit any extra moisture.  There should only be a small amount of soup. 
 
Next, slice your onion into medium-sized pieces.  Do not chop or mince.  Sliver approximately 3 cloves of garlic.  Heat oil on medium to high heat.  Begin sautéing the onion and garlic together along with the garlic salt in the oil when the oil is hot (I test this by sprinkling a little water into the oil.  If it sizzles, it's
ready).

 
When the onion is almost transparent, add the carrots.  Sauté for approximately five minutes.


Add the cabbage and sauté for about another five minutes.  


While this is cooking, season your meat.  I always implement my favorite seasonings: garlic powder, onion powder, seasoned salt, and pepper.  Add the seasoned meat to your stir fry and sauté altogether.  


When the meat is nearly cooked through but still a bit pink on the inside, add your ramen noodles and stir-fry altogether.  Keep turning and sautéing approximately 5 minutes or until meat is cooked through. Right before you remove from heat, add a dash of Soy, and if you prefer, diced green onion. Cook approximately one minute.  All set!  Serves about 8-10.
 
 
If you enjoy this post, please visit the archives!  You may also visit my full profile to view my other blogs. Connect with me on my Facebook Page, Parsimonious Perfection.   You might like to visit my other blog hubs,

The Marvelous Maison, a lifestyle blog hub and 
Frugal Fab Fashionista, my fashion blog hub. 
 
Follow me on Pinterest!!
 
Thank you for stopping by! ❤


Sunday, September 1, 2013

Festive Fun Halloween Cupcakes

It's almost that whimsical time of year when kiddies take to the streets for frightful fun. If you prefer to throw a stay-at-home spooktacular, the following recipe is a fun and easy take on the regular cupcake.

This "Chocolatetown Special Cake" recipe via the Hershey Company has been a favorite of mine for more years than I care to mention ☺.  You may opt to use it or a boxed cake mix for the cupcakes.

Cake

You will need:

1/2 cup Hershey's Cocoa
1/2 cup boiling water
2/3 cup shortening
1 3/4 cups sugar
1 teaspoon vanilla
2 eggs
2 1/4 cups unsifted all-purpose flour
1 1/2 teaspoons baking soda
1/2 teaspoon salt
1 1/3 cups buttermilk or sour milk*
Paper baking cups

*To make sour milk:  mix 4 teaspoons vinegar plus milk to equal 1 1/3 cups.

Stir together cocoa and boiling water in a small bowl until smooth.  Set aside. Cream shortening, sugar, and vanilla together in a large bowl until light and fluffy. Add eggs; beat well. Combine flour, baking soda and salt in a separate smaller bowl. Add alternatively with buttermilk to creamed
mixture.  Blend in cocoa mixture.   Pour into a muffin tin lined with baking cups.  Bake at 350 degrees approximately 25-30 minutes or until an inserted cake tester or toothpick comes out clean. Cool ten minutes.  Remove from pan. Cool completely. Frost as desired.


To frost my cupcakes, I used regular sanding sprinkles and these adorable Halloween-themed stencils both available at Williams-Sonoma.


 The box comes in a set of four, including a bat, spider, skull, and cat. 


Frosting technique:    I used Pilsbury premade Creamy Supreme cream cheese frosting. After cupcakes have cooled and have been frosted, carefully place stencil just above the frosted cupcake.  Dust with colored sprinkles. I chose to use black.

A word; the sprinkles are a bit more difficult to pull off, unlike the skull, shown here, in which I omitted the frosting and instead used powdered sugar.


You may also opt to use cocoa powder, or do as I've done here, making a special treat for the grown-ups by dusting with flavored instant coffee.

If you enjoy this post, please visit the archives!  You may also visit my full profile to view my other blogs. Connect with me on my Facebook Page, Parsimonious Perfection.   You might like to visit my other blog hubs,

The Marvelous Maison, a lifestyle blog hub and 
Frugal Fab Fashionista, my fashion blog hub. 
 
Follow me on Pinterest!!
 
Thank you for stopping by! ❤


Saturday, August 17, 2013

Positively Decadent French Toast

French toast, or Pain Perdu in French, likely originated as a way to make use of stale or day-old bread.   Most recipes implement a method of dipping bread into egg and frying the bread until crisp. If you've read some of my prior posts, you know I have a terrible sweet tooth. This is my spin on French toast.  Using bread that is already cinnamon-infused truly takes this favorite to a new level.

You will need:
Cinnamon or cinnamon raisin bread (Cinnabon, Pepperidge Farm, and 
Aunt Hattie's all have options)
One large egg
2-3 tablespoons of milk
1/8 teaspoon cinnamon sugar
1/8 teaspoon vanilla
Butter
Powdered sugar for dusting 


Blend by whisking together the egg, vanilla, milk, and cinnamon sugar.

Warm 1 tablespoon of butter in a frying pan on medium heat. Dredge bread in egg mixture and pan fry both sides until crisp. Serve with:  A healthy dollop of Marshmallow Cream Cheese. To view recipe, visit the archives by clicking here.  
Enjoy!

If you enjoy this post, please visit the archives!  You may also visit my full profile to view my other blogs. Connect with me on my Facebook Page, Parsimonious Perfection.   You might like to visit my other blog hubs,

The Marvelous Maison, a lifestyle blog hub and 
Frugal Fab Fashionista, my fashion blog hub. 
 
Follow me on Pinterest!!
 
Thank you for stopping by! ❤


Friday, August 16, 2013

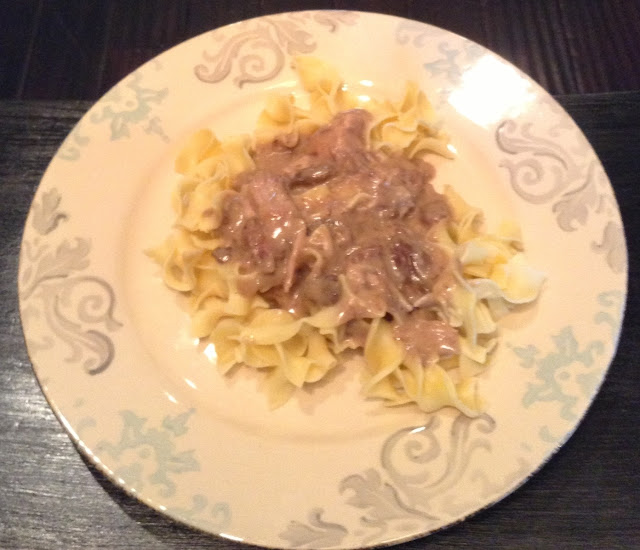
Delectable, Super-Easy Beef Stroganoff

The Russian dish Beef Stroganoff is so wonderfully hearty!  I love the richness of the flavored beef which pairs perfectly with the cool of the sour cream. The recipe has evolved over years and years, and did not originally include mushrooms.  I am a mushroom lover so I always include mushrooms in my stroganoff.  This recipe is a shortcut to making really wonderful stroganoff, lickety-split.  

You will need:

2 Pre-packaged 15 ounce Beef tips in Gravy
2 packages egg noodles
2 eight-ounce cans cream of mushroom soup 
1 four-ounce or small can of mushrooms
1/4 cup sour cream
1 tablespoon flour
Fresh Cracked pepper
1/4 teaspoon Salt


Prepare egg noodles according to package directions.  While the noodles are cooking, empty the beef tips into a large pan. I prefer to use a wok.  Sauté the beef tips on medium heat.  Open the can of mushrooms and drain. Stir the cream of mushroom soup and mushrooms into the beef tips.  Continue to sauté until the cream of mushroom soup has completely melted and combined with the beef and gravy.  Stir in flour and salt.  Reduce heat to low. Sauté for approximately 5 minutes.  Add the sour cream.   Combine. Heat until all ingredients are melted together.  Serve over prepared noodles. Garnish with fresh cracked black peppercorns. Enjoy!!  Serves 10.

If you enjoy this post, please visit the archives!  You may also visit my full profile to view my other blogs. Connect with me on my Facebook Page, Parsimonious Perfection.   You might like to visit my other blog hubs,

The Marvelous Maison, a lifestyle blog hub and 
Frugal Fab Fashionista, my fashion blog hub. 
 
Follow me on Pinterest!!
 
Thank you for stopping by! ❤


Baja-Style Tacos Recipe #2

I love a great Baja-Style fish taco.  I use two different recipes for my versions of Baja-styled tacos. I got this particular recipe via the Food Network from the show Big Daddy's House with host Aaron McCarto Jr.  This second fish taco recipe is an option I use when we have guests, or when we are relaxing on the weekend, enjoying one another's company.  

Second Recipe
You will need: 
Salmon or other firm fish such as shark, tuna, et cetera
Olive oil
Seasoned salt
Onion powder
Garlic powder
Black pepper
Flour tortillas
Lemons and limes for garnish.  


First, season your fish by coloring it with the garlic powder, onion powder, seasoned salt and black pepper. Flip and repeat to season both sides.   


Pan-fry your fish on medium heat in hot olive oil. I use approximately 2-3 tablespoons per piece of fish. Cook on one side until it is near crisp, then flip and repeat. It is much like blackened fish.  While your fish is frying, warm your flour tortillas using a tortilla warmer. 


Construct tacos and serve with pico-style guacamole. To see the recipe for it in the archives, click here.  
Garnish with lemon and lime wedges. Enjoy!!  For this particular type of fish taco, I suggest that you pair it with a hot sauce high in vinegar taste such as Cholula. It is fantastic!


If you enjoy this post, please visit the archives!  You may also visit my full profile to view my other blogs. Connect with me on my Facebook Page, Parsimonious Perfection.   You might like to visit my other blog hubs,

The Marvelous Maison, a lifestyle blog hub and 
Frugal Fab Fashionista, my fashion blog hub. 
 
Follow me on Pinterest!!
 
Thank you for stopping by! ❤


Tuesday, August 13, 2013

Strawberries and Marshmallow Cream Cheese


Strawberries with cream or whipped cream has been a time-tested favorite treat for years and years.  The desert, which originated in England, combines the tart wonderful flavor that is the strawberry with the cool, sweet flavor of cream.  A few years back, my gal-pal Candace brought to the office the most fantastic spin on strawberries and cream I'd ever tasted.  She has been gracious enough to allow me to share it here with you!  

You will need: 
One 7 ounce jar of marshmallow fluff
One 8 ounce block of cream cheese, softened
Fresh Strawberries, stems removed


The recipe is quite simple. Blend together the cream cheese and marshmallow fluff. Serve with strawberries!  This is really, truly delicious; the flavor is much like a cheesecake sans the crust. I also use the marshmallow cream cheese in several other recipes....which I hope to be posting soon. ☺


If you enjoy this post, please visit the archives!  You may also visit my full profile to view my other blogs. Connect with me on my Facebook Page, Parsimonious Perfection.   You might like to visit my other blog hubs,

The Marvelous Maison, a lifestyle blog hub and 
Frugal Fab Fashionista, my fashion blog hub. 
 
Follow me on Pinterest!!
 
Thank you for stopping by! ❤


Thursday, August 8, 2013

Chunky Pico-Style Guacamole

We love, love, love guacamole in my house!  It can be made and served so many different ways.  This version of guacamole I cannot take credit for.  I got the recipe via the Food Network from the show Big Daddy's House with host Aaron McCarto Jr. This recipe is a great variation of typical blended guacamole, and is so delicious and fresh! 

You will need:

Two large Haas avocados
One large tomato
One medium sized onion
Cilantro
One full garlic
Lemon juice
Lime juice
Salt

Begin by removing the fruit from the avocado.  Chop the fruit into small bits. 

Chop tomatoes, onions, mince the garlic, and cilantro; combine all together. 

Add to the avocado. 


Add lemon and lime juices. I always use bottled; zests can sometimes be bitter causing your juice to be bitter. Use approximately the equivalent of one lemon and half of one large lime. 

Add approximately 1/4 teaspoon of salt. Mix.  Enjoy!!!!

If you enjoy this post, please visit the archives!  You may also visit my full profile to view my other blogs. Connect with me on my Facebook Page, Parsimonious Perfection.   You might like to visit my other blog hubs,

The Marvelous Maison, a lifestyle blog hub and 
Frugal Fab Fashionista, my fashion blog hub. 
 
Follow me on Pinterest!!
 
Thank you for stopping by! ❤


Baja-Style Tacos Recipe #1

I love a great Baja-Style fish taco.  It is one of my favorite summertime foods that we also enjoy year-round; my husband and hobbits love them. I use two different recipes for my versions of Baja-styled tacos. This first recipe is an option I use on school nights or summer days when I'm a bit frenzied with all the auxiliaries (music, dance, sports, scouts, et cetera).  

Fast and Easy Baja Tacos
You will need: 
Beer battered fish filets (I personally like Gorton's)
Corn tortillas
Baja slaw.  See recipe in the archives by clicking here.
Lemons and limes
Guacamole to garnish.  I used my two-minute guacamole recipe from the archives. To view, click here

Cook the battered filets according to package instructions.  I really love Gorton's, they come out very crunchy as if they were fried, yet these are baked filets.  While your fish is cooking, prepare your slaw. It is better fresh, prepared the same day as it is served.  Set aside.  Wedge your lemons and limes, then warm your corn tortillas.  If you like your corn tortillas soft, you may opt to use a tortilla warmer.  If you don't have one, I find wrapping approximately 5 tortillas tightly in a paper towel and microwaving for about 45 seconds to 1 minute works just as well.  If you like your tortillas with a little crisp, place in the still-warm oven for about three minutes (which is how I prepared mine).  Arrange tacos to your liking and serve!


If you enjoy this post, please visit the archives!  You may also visit my full profile to view my other blogs. Connect with me on my Facebook Page, Parsimonious Perfection.   You might like to visit my other blog hubs,

The Marvelous Maison, a lifestyle blog hub and 
Frugal Fab Fashionista, my fashion blog hub. 
 
Follow me on Pinterest!!
 
Thank you for stopping by! ❤


Baja-style Slaw


You will need:

Cabbage (I prefer green)
Radishes
Onion
Lemon juice
Mayonnaise 
Cilantro

Begin by rinsing your veggies.  Cut the radishes into sticks.  This recipe called for three. 


Shred your cabbage.  Slice into cabbage as if you are carving it.  For our family of seven, I used approximately 1/4 the head of cabbage, or about four slices in.


Next, cut the slices into thin strips by cutting longways. Place into large bowl and set aside.


Chop onion.  Approximately 1/8 cup.  Add to your bowl.

Chop a fair amount of cilantro. About 1/4 cup.  Add to your bowl.


Pour in approximately 1/8 cup lemon juice and 1/2 cup mayonnaise. 

Mix altogether. Enjoy!

If you enjoy this post, please visit the archives!  You may also visit my full profile to view my other blogs. Connect with me on my Facebook Page, Parsimonious Perfection.   You might like to visit my other blog hubs,

The Marvelous Maison, a lifestyle blog hub and 
Frugal Fab Fashionista, my fashion blog hub. 
 
Follow me on Pinterest!!
 
Thank you for stopping by! ❤