Translate

Wednesday, December 17, 2014

Seven Way Spritz


Christmas is almost here!  Such a wonderful time of year!  It's good to remember why we celebrate this special day which commemorates the birth our our Savior, but it's also great to participate in the fun and whimsical aspect of the season as well.  Part of celebrating whimsy is playing along with the tradition of Santa Claus.  

Every year on Christmas Eve, my children and I place the traditional plate of cookies and milk for Santa.  My favorite to bake each year is Spritz.

Spritz are wonderful, light butter cookies that you make by using a cookie press.  The word Spritz is actually derived from the German word spritzen, meaning to squirt or spray.  This recipe from the Pillsbury Company is the one I have used for years and years, and it is so easy, it's almost fail-proof.  :0)

Ingredient List:

1 cup powdered sugar
1 cup real butter, softened
1/2 teaspoon pure vanilla extract
1 egg
2 1/3 cups all purpose flour
1/4 teaspoon salt

In addition to the ingredients, to make these yummy cookies, you will need:
A cookie press
An ungreased cookie sheet
Cake or Cookie decorating bag and accoutrement
Assorted sprinkles
Frosting
Sugar wash


Preheat oven to 400.  In a large bowl, beat powdered sugar, butter, vanilla, and egg until light and fluffy.  Stir in flour and salt; blend well.  I must say that when my hubby surprised me with my Kitchen Aid mixer, it took some getting used to.  I even still prefer sometimes to use an old-fashioned bowl and hand mixer.  However, with cookies, this mixer SHINES!  I love using the mixer to make cookies, there is such an ease of removal of the dough, it rarely sticks to either the beater or bowl, and works wonderfully.


Fill your cookie press with dough and fit with your desired cookie plate.  Press the dough onto the ungreased cookie sheet.


Bake at 400 for 5 to 7 minutes or until lightly browned on the edges.  Immediately remove from cookie sheets, and cool completely on a cookie cooling rack.

You may serve these cookies plain, and they are lovely.  For my Spritz this year, I thought dressing them up would be fun.  Here are seven different ways (other than plain) to dress up your Spritz.
 

You could spray the cookies with food color spray,


shown here.


Sprinkle the cookies with traditional sugar sprinkles,


Or, make a quick frosting, and use a cake or cookie decorating kit to bead frosting onto the cookies.
My frosting recipe is really simple.  To make bright white frosting, combine approximately 1/4 cup of powdered sugar with 2 tablespoons shortening, and mix well until it is the desired consistency.  Think Oreo cookie cream consistency.


Spoon the frosting into the decorating bag,


and carefully bead onto the cookies.


You can even add fun Sprinkles after you've beaded the frosting, such as these cute red and green mini Christmas trees,


or these pretty blue sprinkles with tiny snowflakes.


Or spray with color, then frost.


Here, I sprayed with color, frosted, then also added mini candy canes to each cookie.


Lastly, you can brush the cookies with a sugar wash (powdered sugar and water), then sprinkle.


  This also keeps the sprinkles in place.


The sprinkles I used came in a multipack of six.  Supercute!!  Gotta love HomeGoods!


To see these cookies featured in my setting for Spritz With Saint Nick, you may visit the post on my blog Parsimonious Décor Darling by clicking here


If you enjoy this post, please visit the archives!  You may also visit my full profile to view my other blogs. Connect with me on my Facebook Page, Parsimonious Décor Darling.   You might like to visit my other blog hubs,

The Marvelous Maison, a lifestyle blog hub and 
Frugal Fab Fashionista, my fashion blog hub. 

Follow me on Pinterest!!  Please be sure to kindly follow the board guidelines, as it takes time and effort to find fabulous pins across the Internet and Pinterest!  Thank you!  

Thank you for stopping by! ❤

Sunday, November 30, 2014

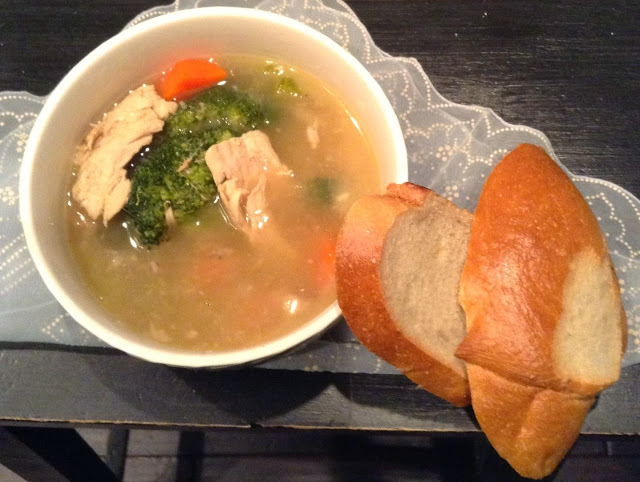
Best-Ever Turkey Soup

If you've read my blog before, you know that one of my favorite cold-weather foods is soup.  So warming for the body and soul!  Today, I am sharing a tradition that I started with my family several years ago.  Every Thanksgiving, I roast a turkey.  Come Sunday, I traditionally use all the remaining meat in a soup.  This soup is very flavorful and a favorite for us! 


For this soup, you will need:

Leftover turkey
One small onion or half a large onion
Garlic cloves, approximately 5-6
Carrots
Broccoli
Celery stalks, approximately three large
A large stockpot
Chicken bouillon
Celery salt
Garlic powder
Onion powder
Small amount of black pepper

Begin by deboning your fowl.  Cube all meat; reserve a bit of fat and broth leftover from roasting as well.  Set aside. 

Fill your stockpot with water.  Put on to boil.  Rinse all vegetables; peel carrots and rinse, set aside.


Chop onion into hearty pieces.  Add to pot.


Add sliced garlic.


Chop celery into pieces, including leaves, and add to pot.  Bring to a boil.


Add cubed turkey, roasting broth, fat, and also add chicken bouillon, approximately two tablespoons.  I personally prefer Caldo Pollo.


Add garlic powder, onion powder, approximately one to two teaspoons each.  Also add celery salt and a small amount of pepper.  Important:  do not omit the celery salt.  It gives the soup the perfect flavor.  I am very heavy-handed with it, but you may use your own discretion.  It smells wonderful in the kitchen!


For this soup, I love hearty pieces of broccoli.  Not only do I include the tops, but I also peel


and chop the stalks into hearty pieces.  


When the onion is transparent, and the celery is almost cooked through,  
add the broccoli.
 

Slice carrots.  When the broccoli is halfway done, add the carrots.  Carrots cook just a bit faster than the broccoli, so I always add them secondary.
 

As the soup boils, the fat will rise.  Remove it with a ladle.
 

All set!  This lovely and tasty soup is best paired with a crusty sourdough.  So good!  Freeze leftovers immediately, or use within 2-3 days.


If you enjoy this post, please visit the archives!  You may also visit my full profile to view my other blogs. Connect with me on my Facebook Page, Parsimonious Décor Darling.   You might like to visit my other blog hubs,

The Marvelous Maison, a lifestyle blog hub and 
Frugal Fab Fashionista, my fashion blog hub. 

Follow me on Pinterest!!  Please be sure to kindly follow the board guidelines, as it takes time and effort to find fabulous pins across the Internet and Pinterest!  Thank you!  

Thank you for stopping by! ❤


Thursday, November 27, 2014

Superrific Pumpkin Bread Mini Loaves


Do you have any traditions on Thanksgiving?  We certainly do in our house!  No Thanksgiving would be complete without traditional banana bread for breakfast (recipe in the archives).  This year however, I decided I would do something a little different and make pumpkin in addition to my typical banana.  This easy and quick bread is light, spicy, and sweet; just perfect for tea, hot coffee, or hot chocolate. 


Preheat Oven to 350 degrees.  Spray mini muffin tins with butter-flavored cooking spray.

Sift together:
1 3/4 cups sifted all-purpose flour
1/4 teaspoon baking powder
1 teaspoon baking soda
1 teaspoon salt
1/2 teaspoon cinnamon
1/4 teaspoon ground cloves

In a large bowl, beat until light and fluffy:
1 1/3 cups sugar
1/3 cup soft shortening
2 eggs

Add and beat in:
1 cup cooked or canned pumpkin

Now add the sifted dry ingredients in 3 additions alternately with:
1/3 cup milk
1/2 teaspoon vanilla

Fold in:
1/2 cup chopped nuts

mix altogether and pour into mini muffin pans.  Place mini pans onto a cookie sheet and bake approximately 25-40 minutes or until toothpick comes out clean.  There's nothing like a crisp winter morning with the scent of fresh bread baking in the oven!

Closer look as they were just beginning to rise.  Mmmmm! 


Enjoy!!  They can be enjoyed by themselves 


or with coffee or tea along with a slice of banana bread to compliment.  ;)


If you enjoy this post, please visit the archives!  You may also visit my full profile to view my other blogs. Connect with me on my Facebook Page, Parsimonious Perfection.   You might like to visit my other blog hubs,

The Marvelous Maison, a lifestyle blog hub and 
Frugal Fab Fashionista, my fashion blog hub. 
 
Follow me on Pinterest!!  Please be sure to kindly follow the board guidelines. Thank you!  
 
Thank you for stopping by! ❤


Friday, November 14, 2014

Easy, Elegant Christmas Cakes


I absolutely love chocolate, don't you?  I think it is great any time of year.  Christmas for most means bread pudding, fruit cake; banana and pumpkin bread.  These are wonderful, but if you are like me you prefer chocolate year-round.  Adding simple garnishes with holiday flair can elevate a simple chocolate cake and make it something special your guests will enjoy.

To complete these recipes, you will need both a springform cake pan and a mini bundt cake pan.


My go-to for chocolate cake has always been the  "Chocolatetown Special Cake" recipe via the Hershey Company.  If you are in a time-crunch, a boxed cake will work just as well. 


Mini Bundt Cakes and Walnut torte:  

Spray your mini bundt cake pan and springform pan with cooking spray. Set aside.  


Hershey's Chocolatetown Special Cake

You will need:

1/2 cup Hershey's Cocoa
1/2 cup boiling water
2/3 cup shortening
1 3/4 cups sugar
1 teaspoon vanilla
2 eggs
2 1/4 cups unsifted all-purpose flour
1 1/2 teaspoons baking soda
1/2 teaspoon salt
1 1/3 cups buttermilk or sour milk*
Paper baking cups

*To make sour milk:  mix 4 teaspoons vinegar plus milk to equal 1 1/3 cups.

Preheat oven to 350 degrees.  Stir together cocoa and boiling water in a small bowl until smooth.  Set aside. Cream shortening, sugar, and vanilla together in a large bowl until light and fluffy. Add eggs; beat well. Combine flour, baking soda and salt in a separate smaller bowl. Add alternatively with buttermilk to creamed mixture.  Blend in cocoa mixture.   Pour batter into your mini bundt pan leaving a 1/4 inch space for rising.  Pour the remaining batter into the springform pan.  It should be approximately one-inch thick if you use a small to medium pan.  Place mini bundt pan on a cookie sheet.  I used a double oven to bake both cakes at the same time.  Bake bundt cakes at 350 degrees approximately 20-25 minutes or until an inserted cake tester or toothpick comes out clean. Cool ten minutes.  Remove from pan. Cool completely. Set aside. 


For the torte, bake approximately ten minutes, or just as edges begin to bubble.  Remove from oven.
Add approximately 1/4 cup chopped walnuts onto the batter followed by 2-3 tablespoons of sugar.


Continue baking at 350 another 10-15 minutes, or until cake tester/toothpick comes out clean. Remove from oven.  Allow cake to cool before removing from the springform pan.

Making Your Presentation Shine

Presentation is everything when entertaining.  To give my mini bundt cakes a little Christmas charm, I added candy melt snowflakes, cranberries, powdered sugar, and sprigs of rosemary as garnish.  Powered sugar is an excellent garish to use when replicating snow, just as rosemary sprigs are similar in appearance to pine needles.  Adding these simple items truly make your cake stand out, and it will impress your guests!

To make the candy melt snowflakes, I simply used this snowflake mold.
 

Melt white candy melts down in a double boiler (or on very low heat).  Spoon into the mold, and allow to cool via refrigeration completely before removing.  To see these treats featured in my Christmas Desert and Tea Tablescape, you may do so by visiting the post on my other blog Parsimonious Décor Darling by clicking here.


Here is a closeup of the torte.


Closeup of the bundts and candy snowflakes. 


Have a wonderful holiday season!!

If you enjoy this post, please visit the archives!  You may also visit my full profile to view my other blogs. Connect with me on my Facebook Page, Parsimonious Perfection.   You might like to visit my other blog hubs,

The Marvelous Maison, a lifestyle blog hub and 
Frugal Fab Fashionista, my fashion blog hub. 

Follow me on Pinterest!!  Please be sure to kindly follow the board guidelines. Thank you!  

Thank you for stopping by! ❤


Wednesday, October 8, 2014

Super-Easy Poison Apples

Don't you just love Fall?  A crisp in the air, lovely turning of the leaves; cozy sweaters in front of warm fireplaces......sigh!  

A wonderful treat this time of year is the candy apple.  If you'd like to give your candied apples an upgrade to make them wicked-cool and a hit among your guests, this is a very simple way to do so.  I hope you enjoy the post! 

You will need:

Small apples, rinsed, dried, and polished
Bulk caramel
1-2 tablespoons milk
Black food coloring
Red food coloring
Wax paper


Pour milk into your pan.  I don't have a double boiler, but my little Caphalon pan worked nicely.


Add caramels.  Melt on low heat, stirring constantly until smooth.  I used a skewer to stir.


Add drops of food coloring.  I added the red first.


Mix color until you no longer see the caramel color.  For the last step, hold the apple by the stem and slowly spoon the melted caramel over the apple.  Place on wax paper and allow to cool.


I made two red apples and three black, adding the black food coloring to the red caramel after making the red apples first.  I decided to make one unusual by first coating in red, allowing it to cool, then drizzling black over the red.  Even more macabre!  Viola!


To see these nummy treats featured in my Dark Tea Party, you may visit the post on my other blog Parsimonious Décor Darling by clicking here.


If you enjoy this post, please visit the archives!  You may also visit my full profile to view my other blogs. Connect with me on my Facebook Page, Parsimonious Perfection.   You might like to visit my other blog hubs,

The Marvelous Maison, a lifestyle blog hub and 
Frugal Fab Fashionista, my fashion blog hub. 
 
Follow me on Pinterest!!  Please be sure to kindly follow the board guidelines. Thank you!  
 
Thank you for stopping by! ❤